We’ve talked about the importance of implementing process before. Process is teachable; process is consistent; process is a key ingredient in business growth. Whether you care about consistency, speed, or teaching someone to follow your process, this estimating hack can help!
PEP doesn’t officially have “Job Templates”, but don’t let that stop you from building some. PEP can help you make a job template that can be copied and used as the foundation for other jobs.
TIP: Build blank templates (areas without items) and teach your team how to add items using forms.
In a Nutshell:
- You’ll make a “Templates” client – to organize your job templates
- You’ll make jobs for this client – these jobs will be your templates
When starting an estimate for a real client, you’ll copy one of the template jobs to kickstart the estimate.
Step 1 – The “Templates” Client:
The easiest way to organize your job templates for quick access is to save them at the top of your client list. You can do that by creating a pseudo “templates” client using punctuation or number as the last name (i.e. “Templates . ”).
Bonus Tip: If your client list is organized alphabetically by last name, punctuation and numbers show up before the letter A.

- Click the + sign to make a new client
- Enter First Name (i.e. Templates)
- Enter Last Name (i.e. “.”)
If your client list is organized alphabetically by last name, this will ensure your templates are at the top of the list - Click SAVE
No need to enter contact info because this will be used only as a place to save your templates.
Step 2 – Make the Job Templates:
“I want to start the bid with a pic of the front exterior of the house, even if I’m estimating an interior project. ”
Example A: RES-INT w/ Cover Pic
In this example we’ll create a basic interior job template that has one area. You’ll be able to have a photo of the house and scope of work appear at the beginning of the estimate. This is a common layout for proposals because you will be able to give an overview with comments on the scope of work before jumping into the different areas of the job.
Note: Because you cannot rearrange areas on an estimate, this job template is helpful so you always start your estimate in the same way, keeping the order consistent.
- Choose your pseudo “templates” client (i.e. Templates . )
It should be at the top of the list. - Click NEW JOB
- Select the JOB TYPE from the dropdown menu (i.e. Residential Interior)
- Enter the JOB NAME (i.e. Int Template BASIC)
You can get as specific as you’d like with the name. - Click SAVE
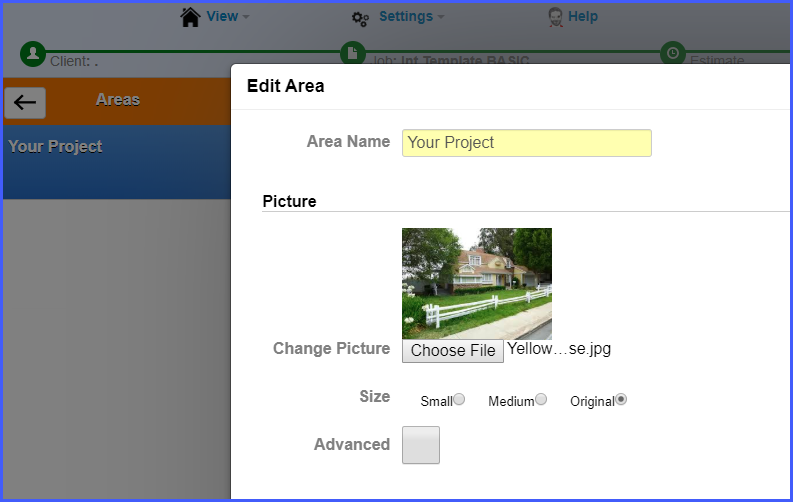
Now it’s time to add an area! - Enter the AREA NAME (i.e. Your Project)
For the customer, this is “your project” that will show up at the beginning of their estimate. This is where you can add a picture of the outside of their home. - Regarding measurements, check the box SKIP THIS STEP
- Click SAVE
Note: Don’t add items to this area, you will do that after copying the template into other jobs and adding new areas. - Click DONE FOR NOW
Now you have an area at the top of your estimate titled “Your Project.” When you copy this job to other estimates, this area will always be at the beginning and the perfect place to add a photo of your client’s house and notes about the project.
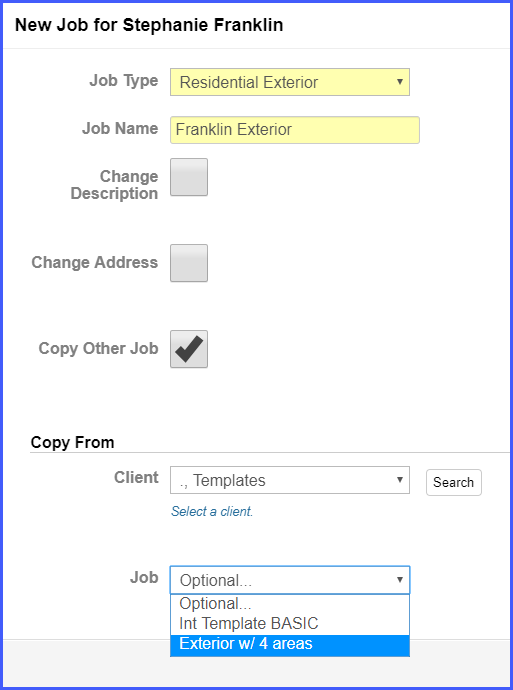
How do I use this job template in a new estimate?
- Choose the Client
- Click NEW JOB
- Select the JOB TYPE from the dropdown menu (i.e. Residential Interior)
- Enter the JOB NAME
- Check the box COPY OTHER JOB
- Select your pseudo “templates” client from the dropdown menu (i.e. Templates . )
It should be at the top of the list. - Select the Job you want to copy from the dropdown menu (i.e. Int Residential BASIC)
Do not enter items to this area, you will add new areas to enter items. - Click EDIT AREA
- Add a picture by clicking CHOOSE FILE
- Scroll down to the SPEC field and enter notes about the scope of work
- Click SAVE
- Click the + sign to add new areas
- Enter measurements and items for each area
“I want to save time by having the basic exterior areas already set up.”
Example B: Basic Exterior
Here is an example of a more complex exterior job template that includes various areas. This type of template will save you time because the areas will automatically show up in the same order on all of your estimates.
- Choose your pseudo templates client (i.e. Templates . )
It should be at the top of the list. - Click NEW JOB
- Select the JOB TYPE from the dropdown menu (i.e. Residential Exterior)
- Enter the JOB NAME (Exterior w/ 4 Areas)
- Click SAVE
- Enter the name of the 1st area (i.e. Front of House)
- Check the box I HAVE SOME BASIC MEASUREMENTS
- Enter measurements (i.e. 10 x 10)
You will be able to modify the measurements each time you copy the job - Choose the WALL SHAPE
You will be able to modify the shape each time you copy the job - Click SAVE
Note: If you want to add items to the template, choose an exterior form from the dropdown menu (i.e. RES-EXT Siding Spray). OR keep it blank and add items after copying the template into other jobs.
Keep in Mind: It’s easier to use a form to add items later than it is to delete or modify items you’ve already added (windows, doors, prep changes for each house). - To continue building the template, click COPY AREA 3 more times.
- Select a copied area and click EDIT
- Enter a new name for the 2nd area (i.e. Left Side) >> Click SAVE
- Enter a new name for the 3rd area (i.e. Back of House) >> Click SAVE
- Enter a new name for the 4th area (i.e. Right Side) >> Click SAVE
- Click DONE FOR NOW
How do I use this job template in a new estimate?
- Choose the Client
- Click NEW JOB
- Select the JOB TYPE from the dropdown menu (i.e. Residential Exterior)
- Enter the JOB NAME
- Check the box COPY OTHER JOB
- Select your pseudo templates client from the dropdown menu (i.e. Templates . )
It should be at the top of the list. - Select the Job from the dropdown menu (i.e.Exterior w/ 4 areas)
You now have 2 saved job templates in the dropdown menu. - Click SAVE
The project now has 4 areas. - For each area, click EDIT AREA to add a picture
- Click the MEASUREMENTS tab to adjust measurements
- Click APPLY CHANGES
If you have items in your template, PEP will update totals based on new measurements.
Note: Don’t forget to add the number of windows, doors and hours for prep to each area!
Job templates are valuable tools for establishing a process for your business, especially if you have a team of estimators working on different projects. Create job templates that will walk them through all the basic pieces of the estimate and teach them how to add items using forms. (Read more about forms here).
Tip: If your template contains auto-calculating items, create a simplified form with the variable items (i.e. windows, doors, prep).
You can get creative with your templates. They can be very detailed or simple. And you can make as many as you’d like!
Recent Comments