In our last post we introduced you to Production Rates and how they make estimating quick and accurate by calculating how long a task will take. Now we’re going to walk through customizing your own form using Production Rates.
A form is list of pre-saved items you can access quickly and easily when building your estimate. PEP has a number of forms ready for you to use, or you can make your own to save materials and notes you use regularly. Forms are made inside of a job so start by selecting a client and a job, then make a new area (enter basic measurements) and get ready to add items (click ADD ITEMS if the window doesn’t automatically pop up).
FYI – Everyone can use forms, but only PRO Subscribers can customize forms and make their own.
Step 1: Decide what items/tasks you want on your form and which Production Rates you want to use for each task.
Focus on a single area that you regularly work on; a basic interior room for example.
- Make a list of all the tasks you regularly do there (what goes into prep, what gets painted, etc).
- Explore the Production Rate Library.
- Identify which Production Rates you want to use on those tasks.
Things to keep in mind: :
- You can use the same Rate for multiple tasks.
- You can use Production Rates for some tasks and hourly lines for other tasks.
- You can have multiple lines for the same task, just remember that you’ll want to delete one when you’re estimating.
For example, you can have a line for Siding and a line for Brick on the same form, but you might not use them in the same area.
Step 2: Begin your estimate
Forms are made inside of a job, so start by selecting a client and a job, make a new area and check “I have some Basic Measurements”, then add items.
Note: Give the area some basic measurements and let the form calculate the surface area of interior walls, ceiling, exterior body, and int/ext trim.
Step 3: Build your form
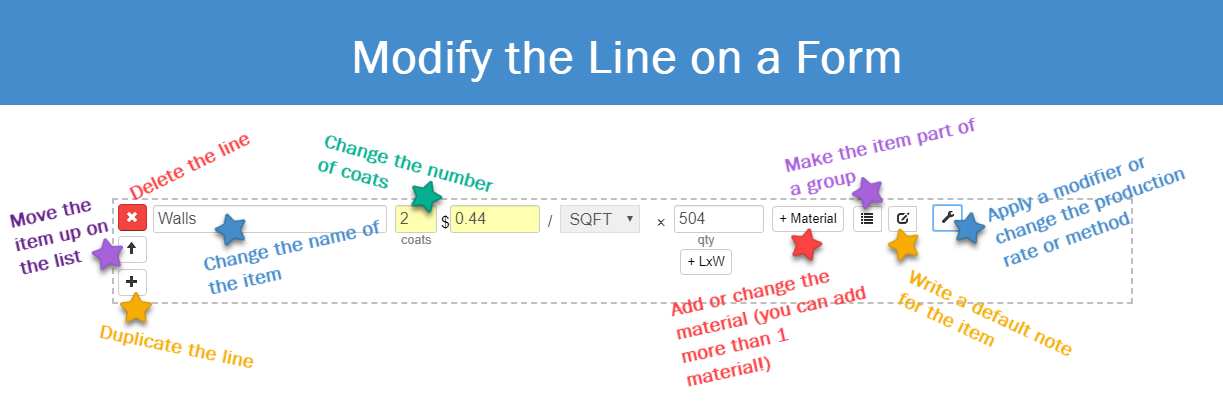
Whether you’re editing an existing form or building something from scratch, once you’ve selected a Production Rate, there are a number of things you can modify.
- Change what the item is called.
- Change the number number of coats on some or all of the lines.
- Add/change the material used.
- Change the default production rate used on a line.
- Remove a line (click the red X).
- Duplicate a line.
- Add lines for tasks that are not there.
Now, let’s get to actually building or editing your form!
Option A: Edit an existing form
In the preloaded forms, each line item is attached to a Production Rate (except for “Prep”). The calculation is determined by how the item is charged. Square/foot and linear/foot are automatically calculated using the basic measurements you provided; you need to enter the quantity of singular items (doors, windows, etc) and time for Prep. The price shown is based on the Production Rate. The number of coats will impact how much the work costs because it takes more time to paint 2 coats than 1 coat.
How to Modify a Preloaded Form:
- Select a form from the dropdown menu
- Change the name, number of coats, add a material, or click the wrench icon
– Apply a difficulty modifier or height modifier if the task requires
For example, you might use the same Production Rate for walls and ceilings. Because ceilings involve poles or ladders, you
can apply a difficulty modifier to the ceiling line.
– Or you can select a new Rate from the rate category dropdown menu OR change the Method (if another one is already saved)

- Add a duplicate line item by clicking the “+” below the item you want to copy then click the wrench icon and choose the correct Rate and/or Method from the Production Rate Library.
This is helpful if there are different types of windows or doors in the same area. - Add a new item/task from the Production Rate library (see more info below).
- After making all edits, click SAVE/EDIT (at the top)
- Rename the form to something you will remember for next time
- Click SAVE
Note: If you make changes to a preloaded form and click SAVE/EDIT >> SAVE without renaming the form, the new version will replace the old version.
Modifying a preloaded form is the fastest and easiest way to adjust Production Rates, especially for individually priced items per hour (i.e. windows and doors) because there are many different styles available in the Production Rate Library. Making modifications using the wrench icon gives you flexibility in editing a default (or preloaded) form and making it really what you want without having to go into the Production Rate Library.
Option B: Build an auto-calculating form from scratch
You can add items to a preloaded form directly from the Production Rate Library (modify a preloaded form by removing things you don’t need and adding things you want) or start a form from scratch that will auto calculate using the measurements you provide. Start by selecting a client and a job, then make a new area (enter basic measurements) and get ready to add items (click ADD ITEMS if the window doesn’t automatically pop up).
How to Add Items Directly from the Production Rate Library:
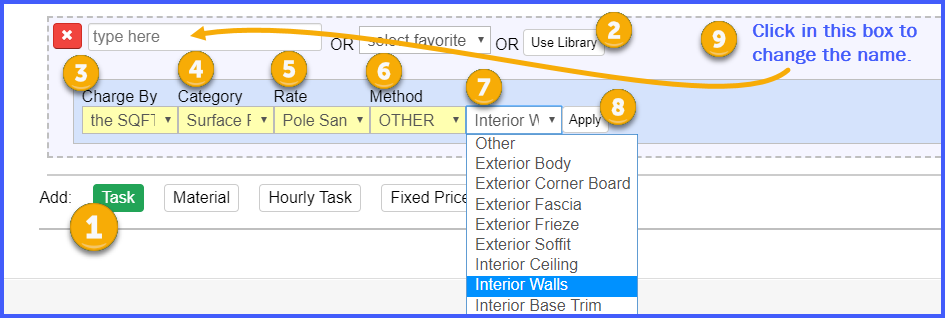
Example 1: We will add “sanding before the first coat of paint” to an interior area.
- Click Add TASK
- Click USE LIBRARY
- Select how you will charge for the item (i.e. SQFT)
- Choose the Rate Category (i.e. Surface Preparation by hand)
- Choose the Rate (i.e. Sanding before the 1st coat)
- Select the Method (i.e. Other)
The next box (without a heading) is the auto calculating box. If the surface area of the task you are adding can be calculated using the basic measurements of the room, you can tell PEP how to apply the measurements (interior ceiling, interior walls, interior base trim, etc).
Note: This does not apply to tasks charged per item. - Choose how PEP will apply the measurements you provided to this task (i.e. Interior Walls. This is optional)
- Click APPLY
By clicking “apply” you are flagging the Production Rate to always be associated with this particular line item. - Change the name of the line item (i.e. Sanding Walls).
Note: PEP defaults the item name to the way it calculated the surface area (i.e. interior walls) so it’s important to remember to change the name to something more descriptive of the task. - Click the UP or DOWN arrows to move items around in your list.
- Click SAVE/EDIT (at the top) to save or update your form.
Example 2: We will add “shutters” to an exterior area.
- Click Add TASK
- Click USE LIBRARY
- Select how you will charge for the item (i.e. item per hour)
- Select the Rate Category (i.e. Screens and Shutters)
- Select the Rate (i.e. Exterior Fixed Slat Louvered Shutters)
- Select the Method (i.e. Brush)
- Leave this set to “Other”; item’s per hour will not use the basic measurements.
- Click APPLY
- Enter the quantity of shutters (i.e. 4)
- Click the UP or DOWN arrows to move items around in your list.
- Click SAVE/EDIT (at the top) to save or update your form.
Note: It’s important to explore the Production Rate Library before building your form because you will need to know what the Production Rate charges by (SQFT, LFT, Hour, etc), what the Rate Category is called as well as the Rate and Method before building a form.
Recent Comments